Example Lead Paint Projects in Concord

Six examples follow, from a Victorian porch to an upstairs apartment, each with the house, the test result, the work and a rough price.

These are examples, not past jobs, clients or addresses. They reflect Central Contra Costa house ages, the steps lead work follows here and 2026 price ranges, so you can get a feel for a job before asking for a quote.

Lead-safe add-on to new flooring through four rooms

Example project

Home
1960s single-story house in Concord
Original request
Replace the flooring in the living room, hall and two bedrooms
Testing
Lead paint on the baseboards, the door casings and the window sills
Rooms
Four rooms, emptied and worked one at a time
Lead-safe add-on
Rooms closed off with plastic, trim misted before it comes off, HEPA tools and a check of each room
Estimated add-on cost
$4,900

Scope of work

Plastic over the floor and across the doorway of each room, misting of the painted baseboards and casings before they come off, HEPA vacuums on the pry tools, daily HEPA vacuuming and a wet wipe, a cleaning check before each room reopens, and bagged disposal. The new floor and the new trim are priced separately.

Project overview

In this example, the owners of a 1960s house in Concord are replacing the flooring in four rooms. To lay it, the floor crew takes off the baseboards and the door casings, and a test shows lead paint on them and on the window sills.

Pulling painted trim in four rooms goes past the minor repair limit, so the flooring crew works with an EPA-certified firm and renovator, and each room is sealed and checked. The extra cost is an add-on to the flooring job, and the owners move out of each room as its turn comes.

The goal

The goal is new floors in four rooms with no lead dust left behind from the trim.

Process

  1. Test Trim and sills tested before the flooring is ordered.
  2. Setup room by room Furniture out, floor and doorway covered, the room sealed.
  3. Trim removal Baseboards and casings misted and pried off with HEPA-vacuum tools.
  4. Check before flooring HEPA vacuuming, a wet wipe and the room checked before the floor goes in.

Planning right

  • Test before the flooring is ordered. A bid that skips the trim is the one that misses the lead.
  • New trim is painted after the room check, not before.
  • Sanding old floors that are painted underneath is a different job, so test the floors too.
  • Children and pets stay out of a room until its check is done.

Get a free quoteMore about lead-safe renovation and remodeling
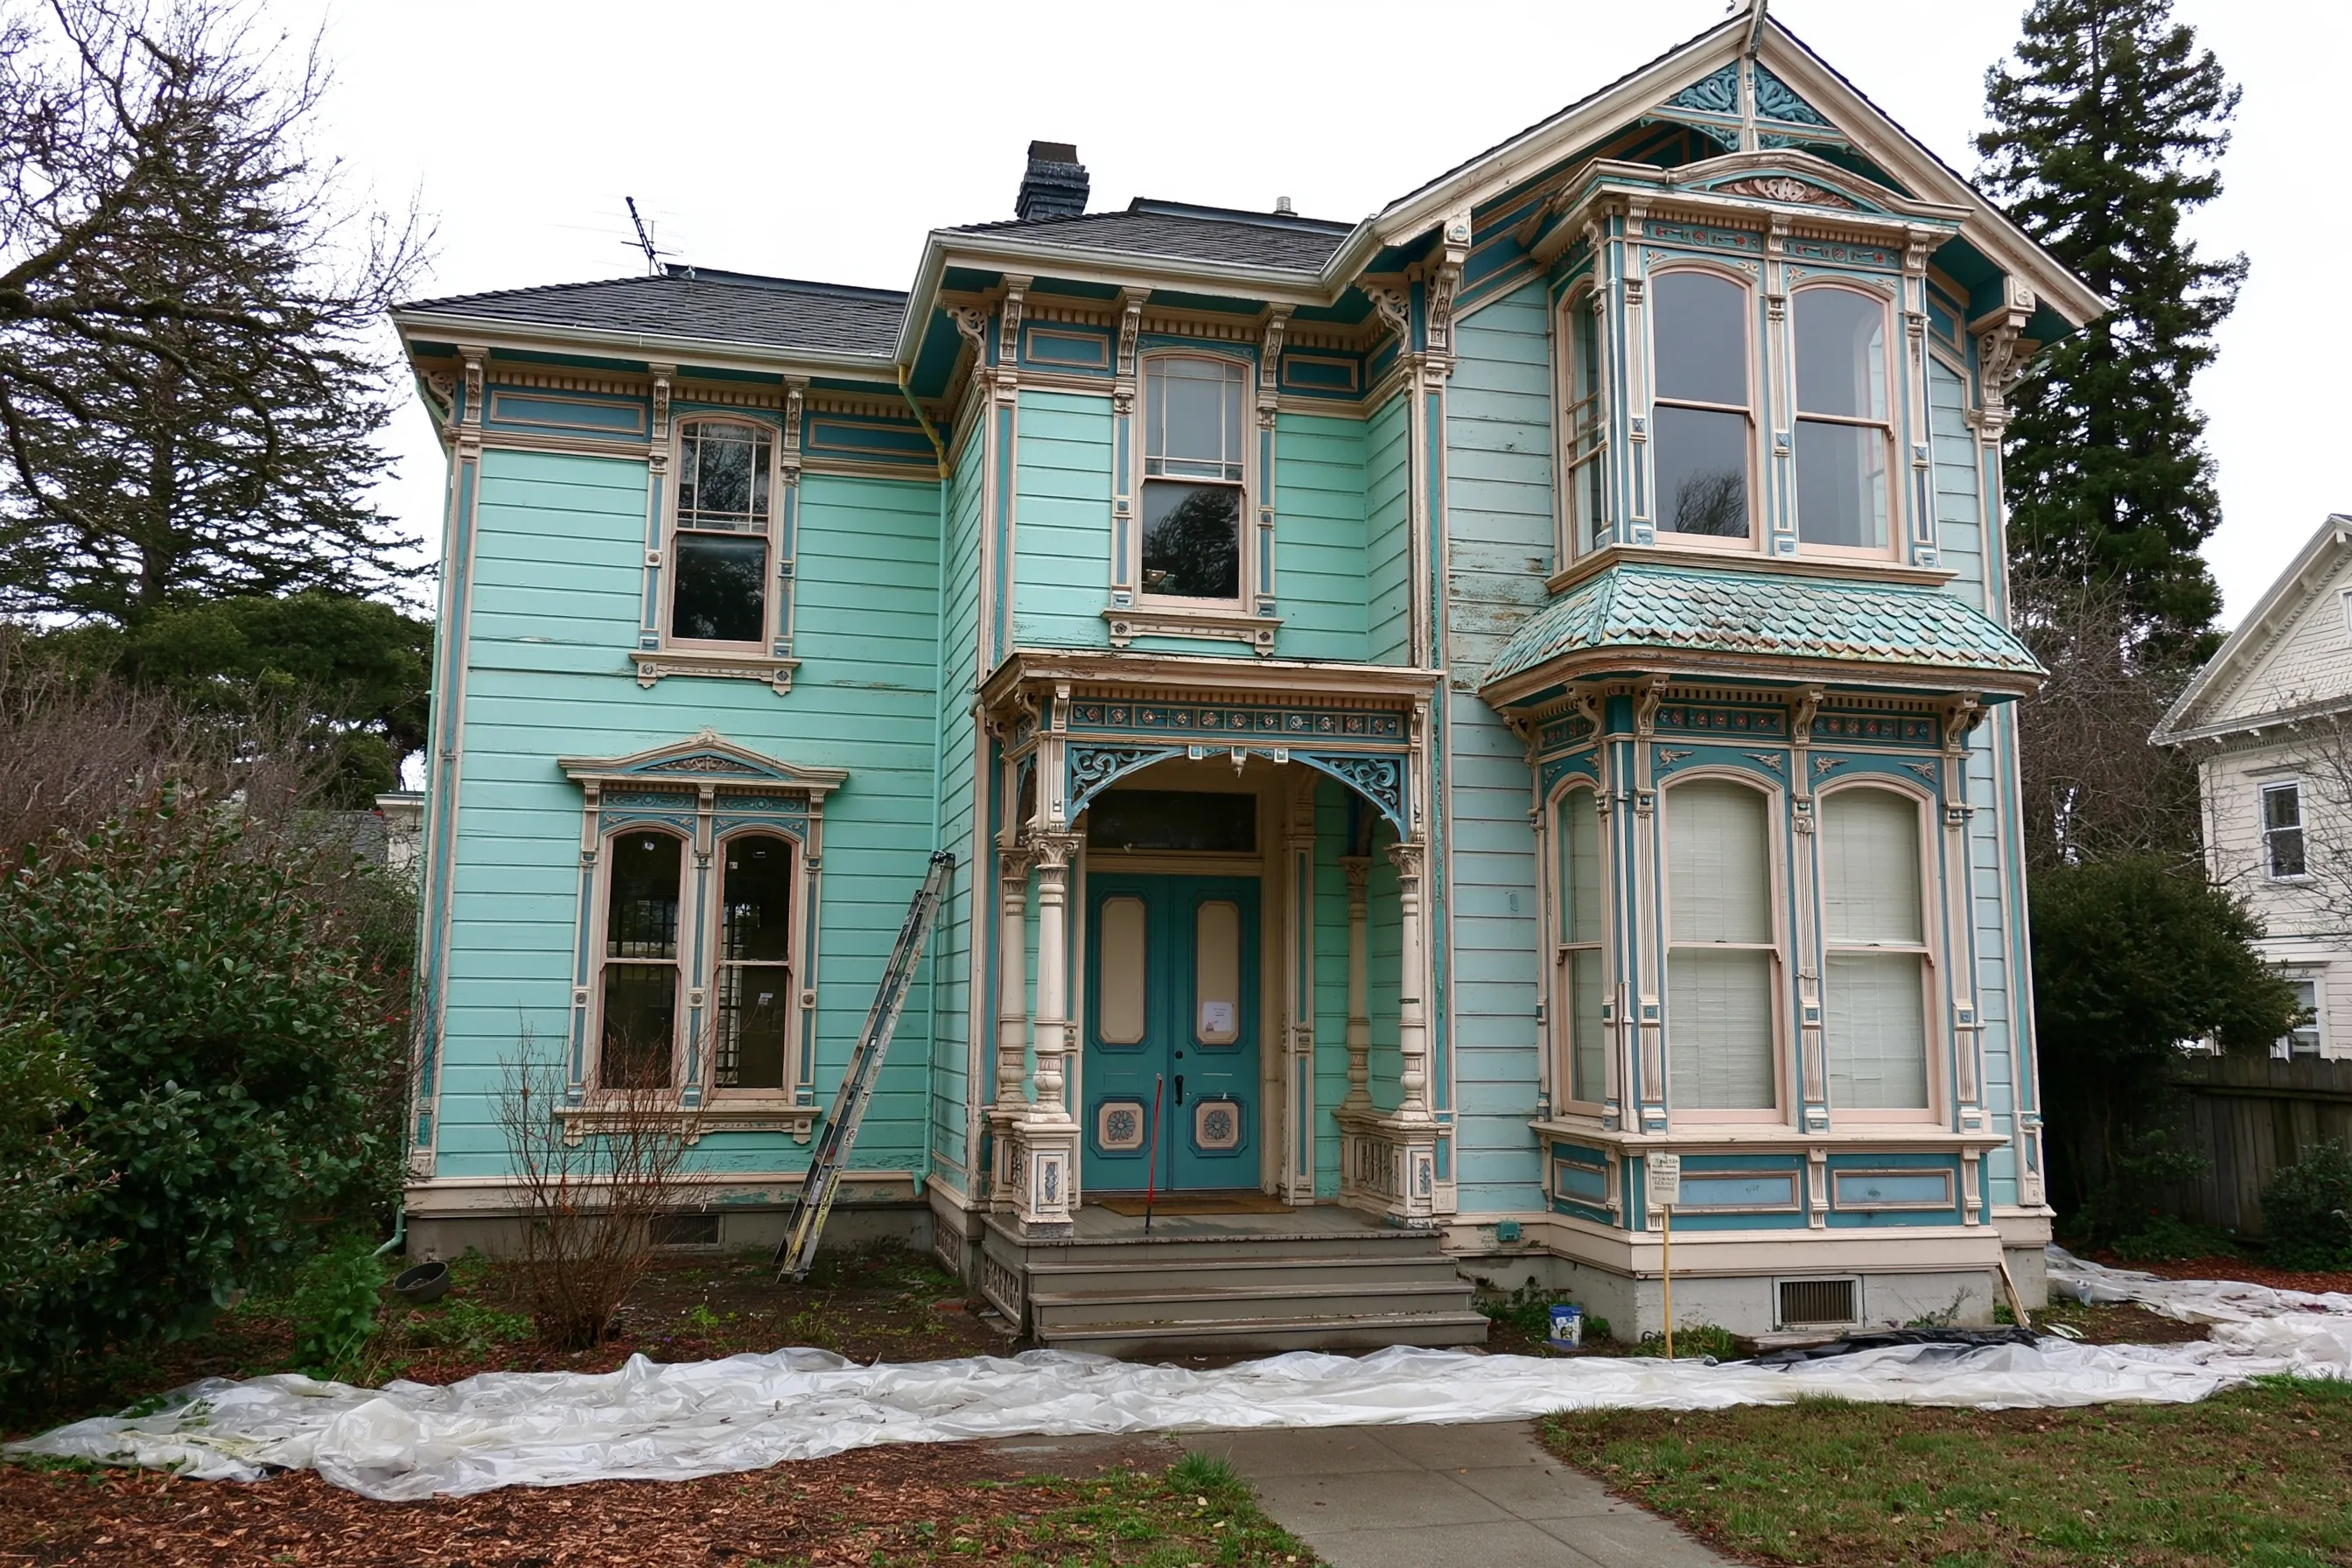
Ornate porch columns and entry trim stripped on a Victorian house

Example project

Two-story Victorian house with painted wood siding and ornate trim, a ladder against the wall and plastic sheeting on the ground in front
Home
1890s Victorian house in an older Martinez neighborhood, two stories with painted wood siding and ornate trim
Original request
Strip the lead paint from the front porch and entry before the house is repainted
Testing
Lead paint on the porch columns, brackets, railing and the trim around the front door
Surfaces
The front porch and entry, about 150 sq ft
Notice
CDPH Form 8551 posted and sent at least five days ahead; neighbors told in writing
Estimated cost
$4,200

Scope of work

Plastic spread over the lawn and the porch steps, a ladder and sheeting at the porch edge, the columns, brackets, railing and entry trim stripped with paste stripper and wet scraping, waste bagged each day, primer and two coats of lead-free paint, and a clearance check of the porch floor and the ground. The siding and the windows are not part of this price.

Project overview

In this example, the owners of an 1890s Victorian in Martinez are repainting the house in stages and start with the front porch, where turned columns, brackets and railing hold many layers of paint. A test shows lead paint on the columns, brackets, railing and the trim around the front door.

They want the porch stripped for good, so the job is abatement: certified workers, Form 8551 posted at the house and sent to CDPH at least five days ahead, and the neighbors told in writing. Before planning removal they ask the city whether the house is listed, and the lead-safe rules apply either way.

The goal

The goal is a front porch with no lead paint left on it and a lawn free of chips, before the rest of the house is repainted.

Process

  1. Notice Form 8551 posted at the house and sent; a letter to each neighbor.
  2. Setup Plastic over the lawn and steps, sheeting at the porch edge.
  3. Stripping Columns, brackets, railing and entry trim stripped wet, waste bagged daily.
  4. Paint Bare wood primed and given two coats.
  5. Clearance Porch floor and ground checked for chips and dust before the plastic comes down.

Planning right

  • Detail work takes longer, which is why the price sits near the top of the porch line.
  • Turned parts that are too far gone are replaced with new ones at extra cost.
  • The siding and the windows carry paint of the same age. Test them before the next stage.
  • Put the clearance report in the house file before the repaint begins.

Get a free quoteMore about exterior lead paint removal

Chipped paint repaired and old windows replaced in an upstairs apartment

Example project

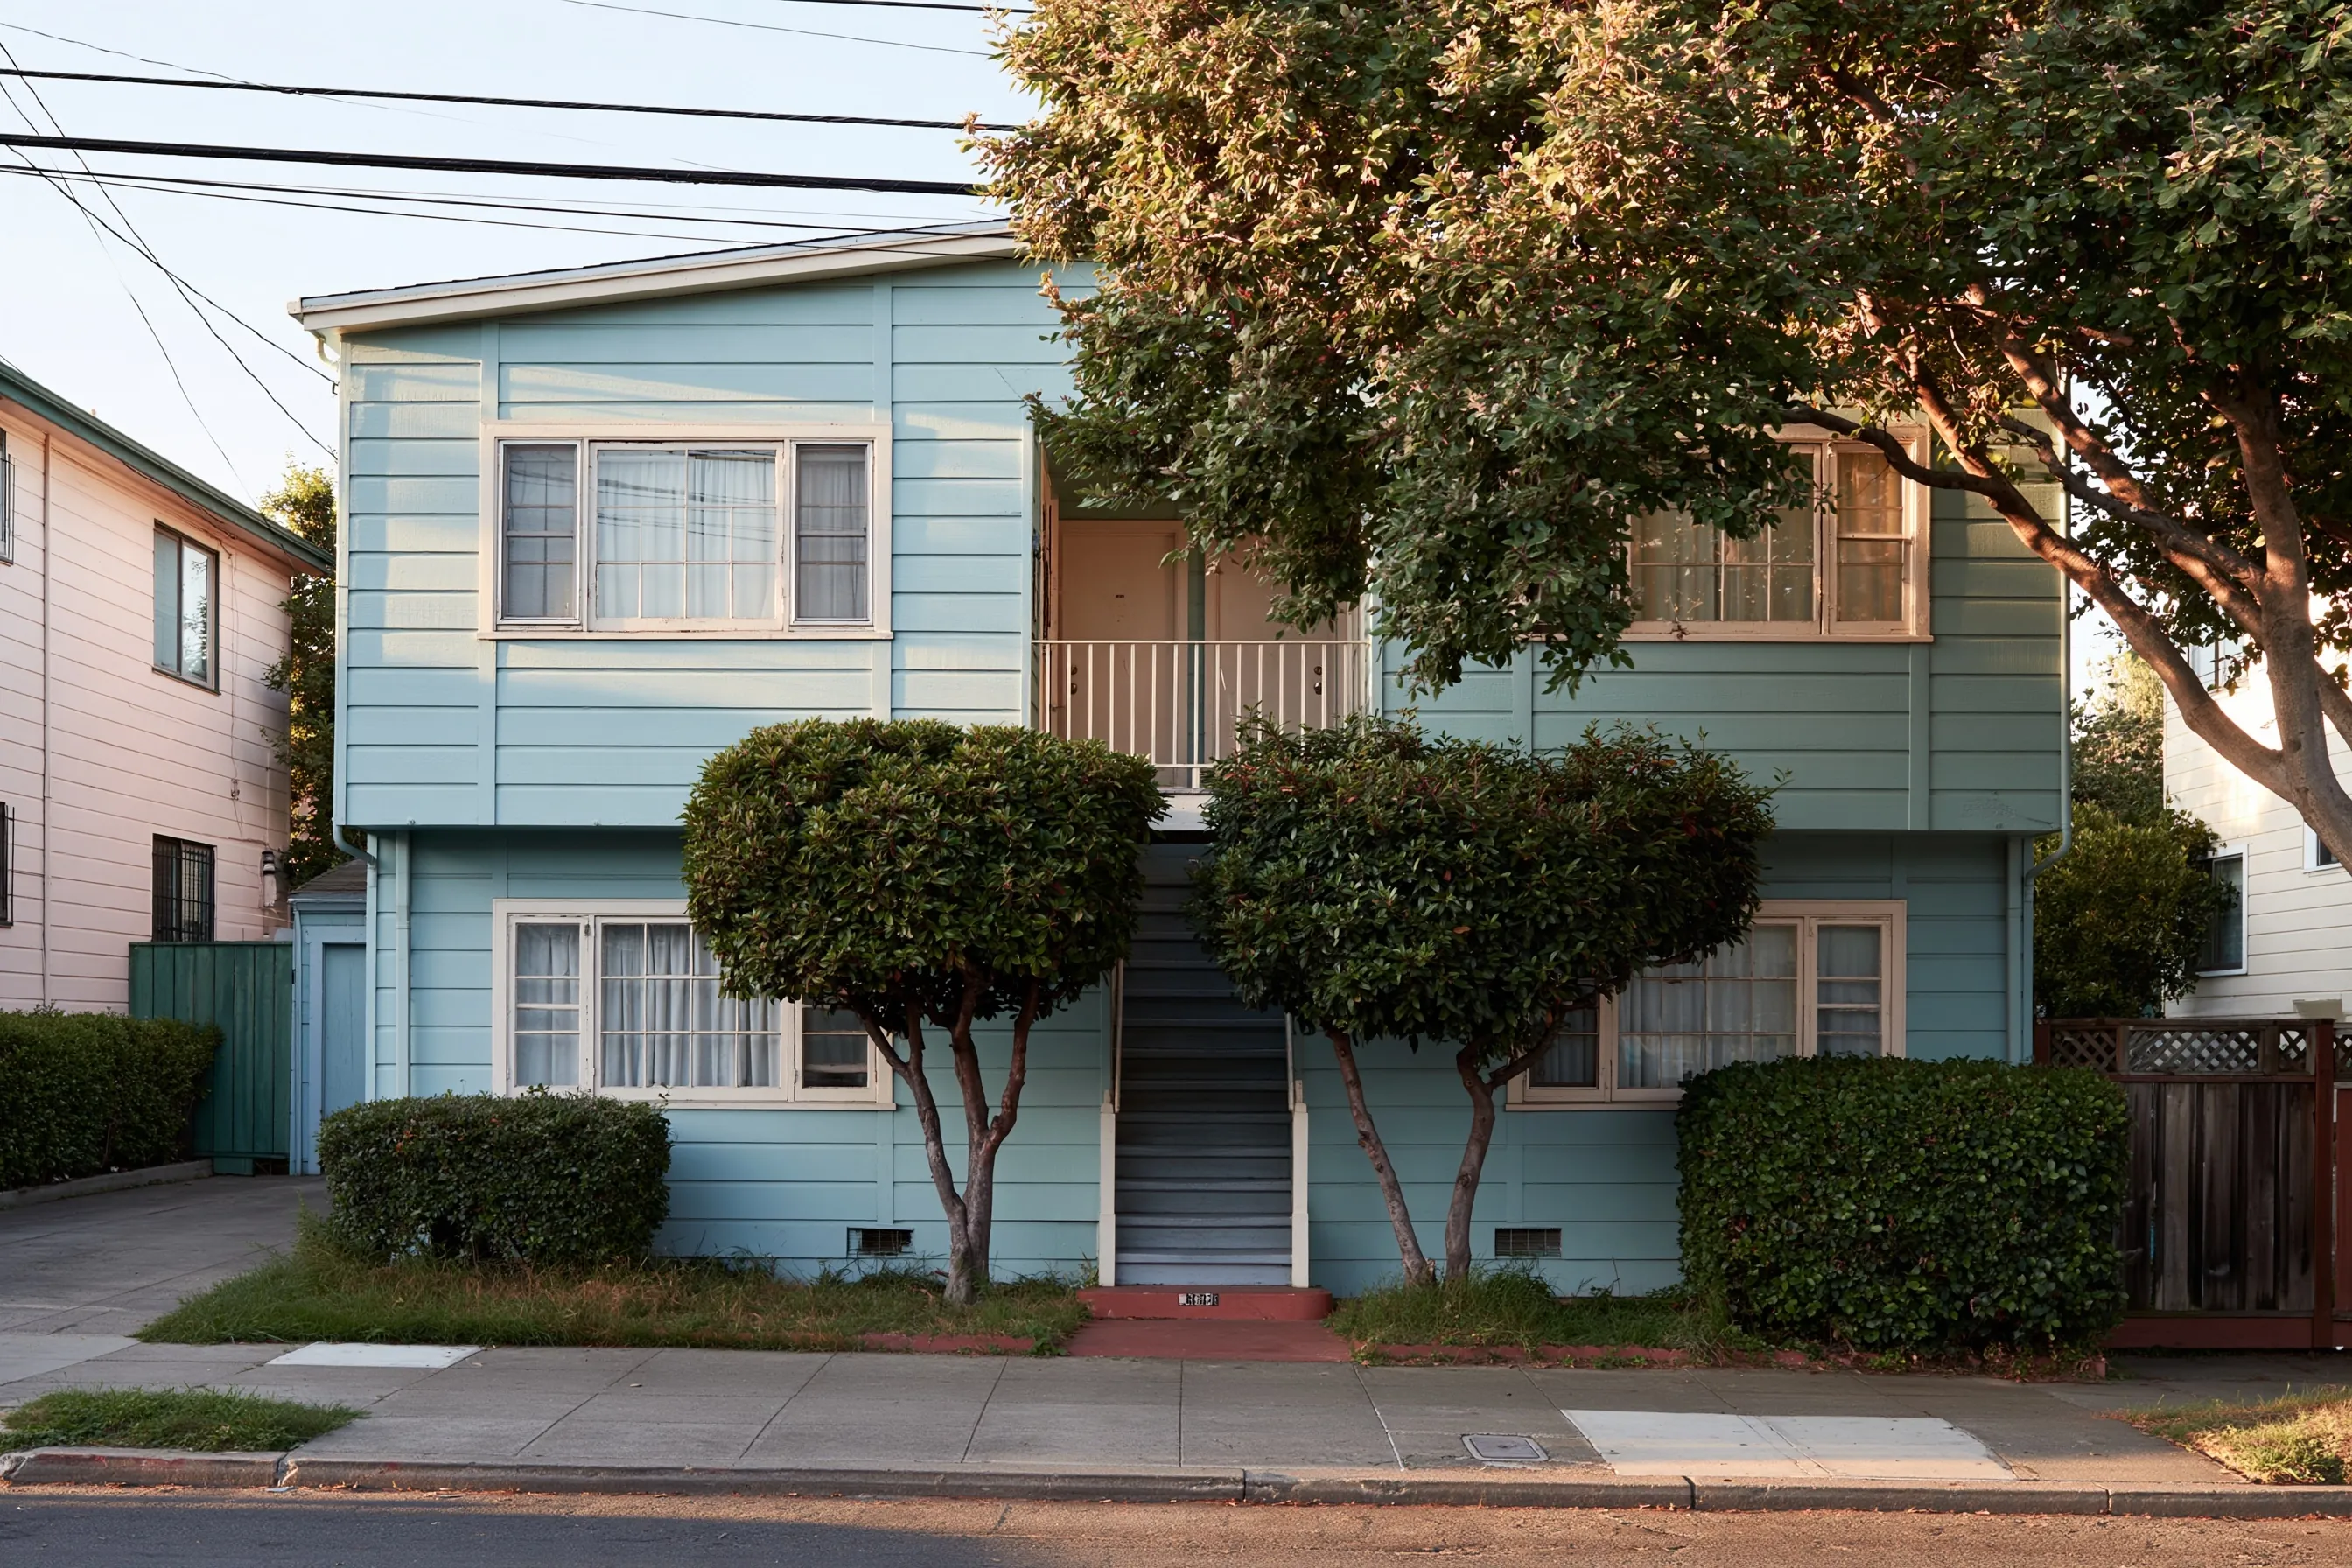
Two-story apartment building with painted wood siding, wood-framed windows and an exterior stair, two trimmed street trees in front
Home
1950s two-story apartment building in Pleasant Hill with painted wood siding and an outside stair
Original request
Replace the drafty windows in an upstairs unit and fix the chipped paint around them between tenants
Testing
Lead paint on the window frames, sills and the trim around them
Work
About 8 wood windows replaced and about 100 sq ft of peeling paint repaired in the unit
Report
A clearance test of the unit for the owner’s file
Estimated cost
$10,100

Scope of work

Plastic over the floors and across every doorway of the unit, the peeling paint misted and scraped, about eight old windows taken out whole and new ones set in the openings, the trim refitted, daily HEPA vacuuming and a wet wipe, a clearance test, and bagged disposal. Painting and any permit fee are not part of this price.

Project overview

In this example, the owner of a 1950s two-story apartment building in Pleasant Hill has an upstairs unit empty. Tenants complained about drafty windows, and the paint on the frames and the trim around them has chipped inside the unit. A test shows lead paint on the frames, sills and trim.

Paid window replacement in a pre-1978 unit is always covered by the federal lead-safe rule, so the unit is sealed and the work is done by a certified firm with a certified renovator. A clearance test at the end gives the owner a result for the unit’s file before the next lease.

The goal

The goal is a unit with tight new windows, a clearance result on file and no lead dust in the rooms.

Process

  1. Testing Frames, sills and trim tested before any work.
  2. Setup Floors and doorways covered, the unit sealed from the stairwell.
  3. Windows Old windows out whole, new ones set, trim refitted.
  4. Repair Peeling paint misted and scraped, then HEPA cleanup.
  5. Clearance A clearance test of the floors and sills before the unit is rented.

Planning right

  • Hand the federal lead disclosure to the next tenant with the lease.
  • Other units probably have the same windows. Test them before replacing any.
  • Concord’s rental inspection program says nothing about lead and does not reach Pleasant Hill.
  • File the test report and the clearance result under the unit.

Get a free quoteMore about apartment and multi-family lead paint work

One sticking window and its casing replaced in a 1940s house

Example project

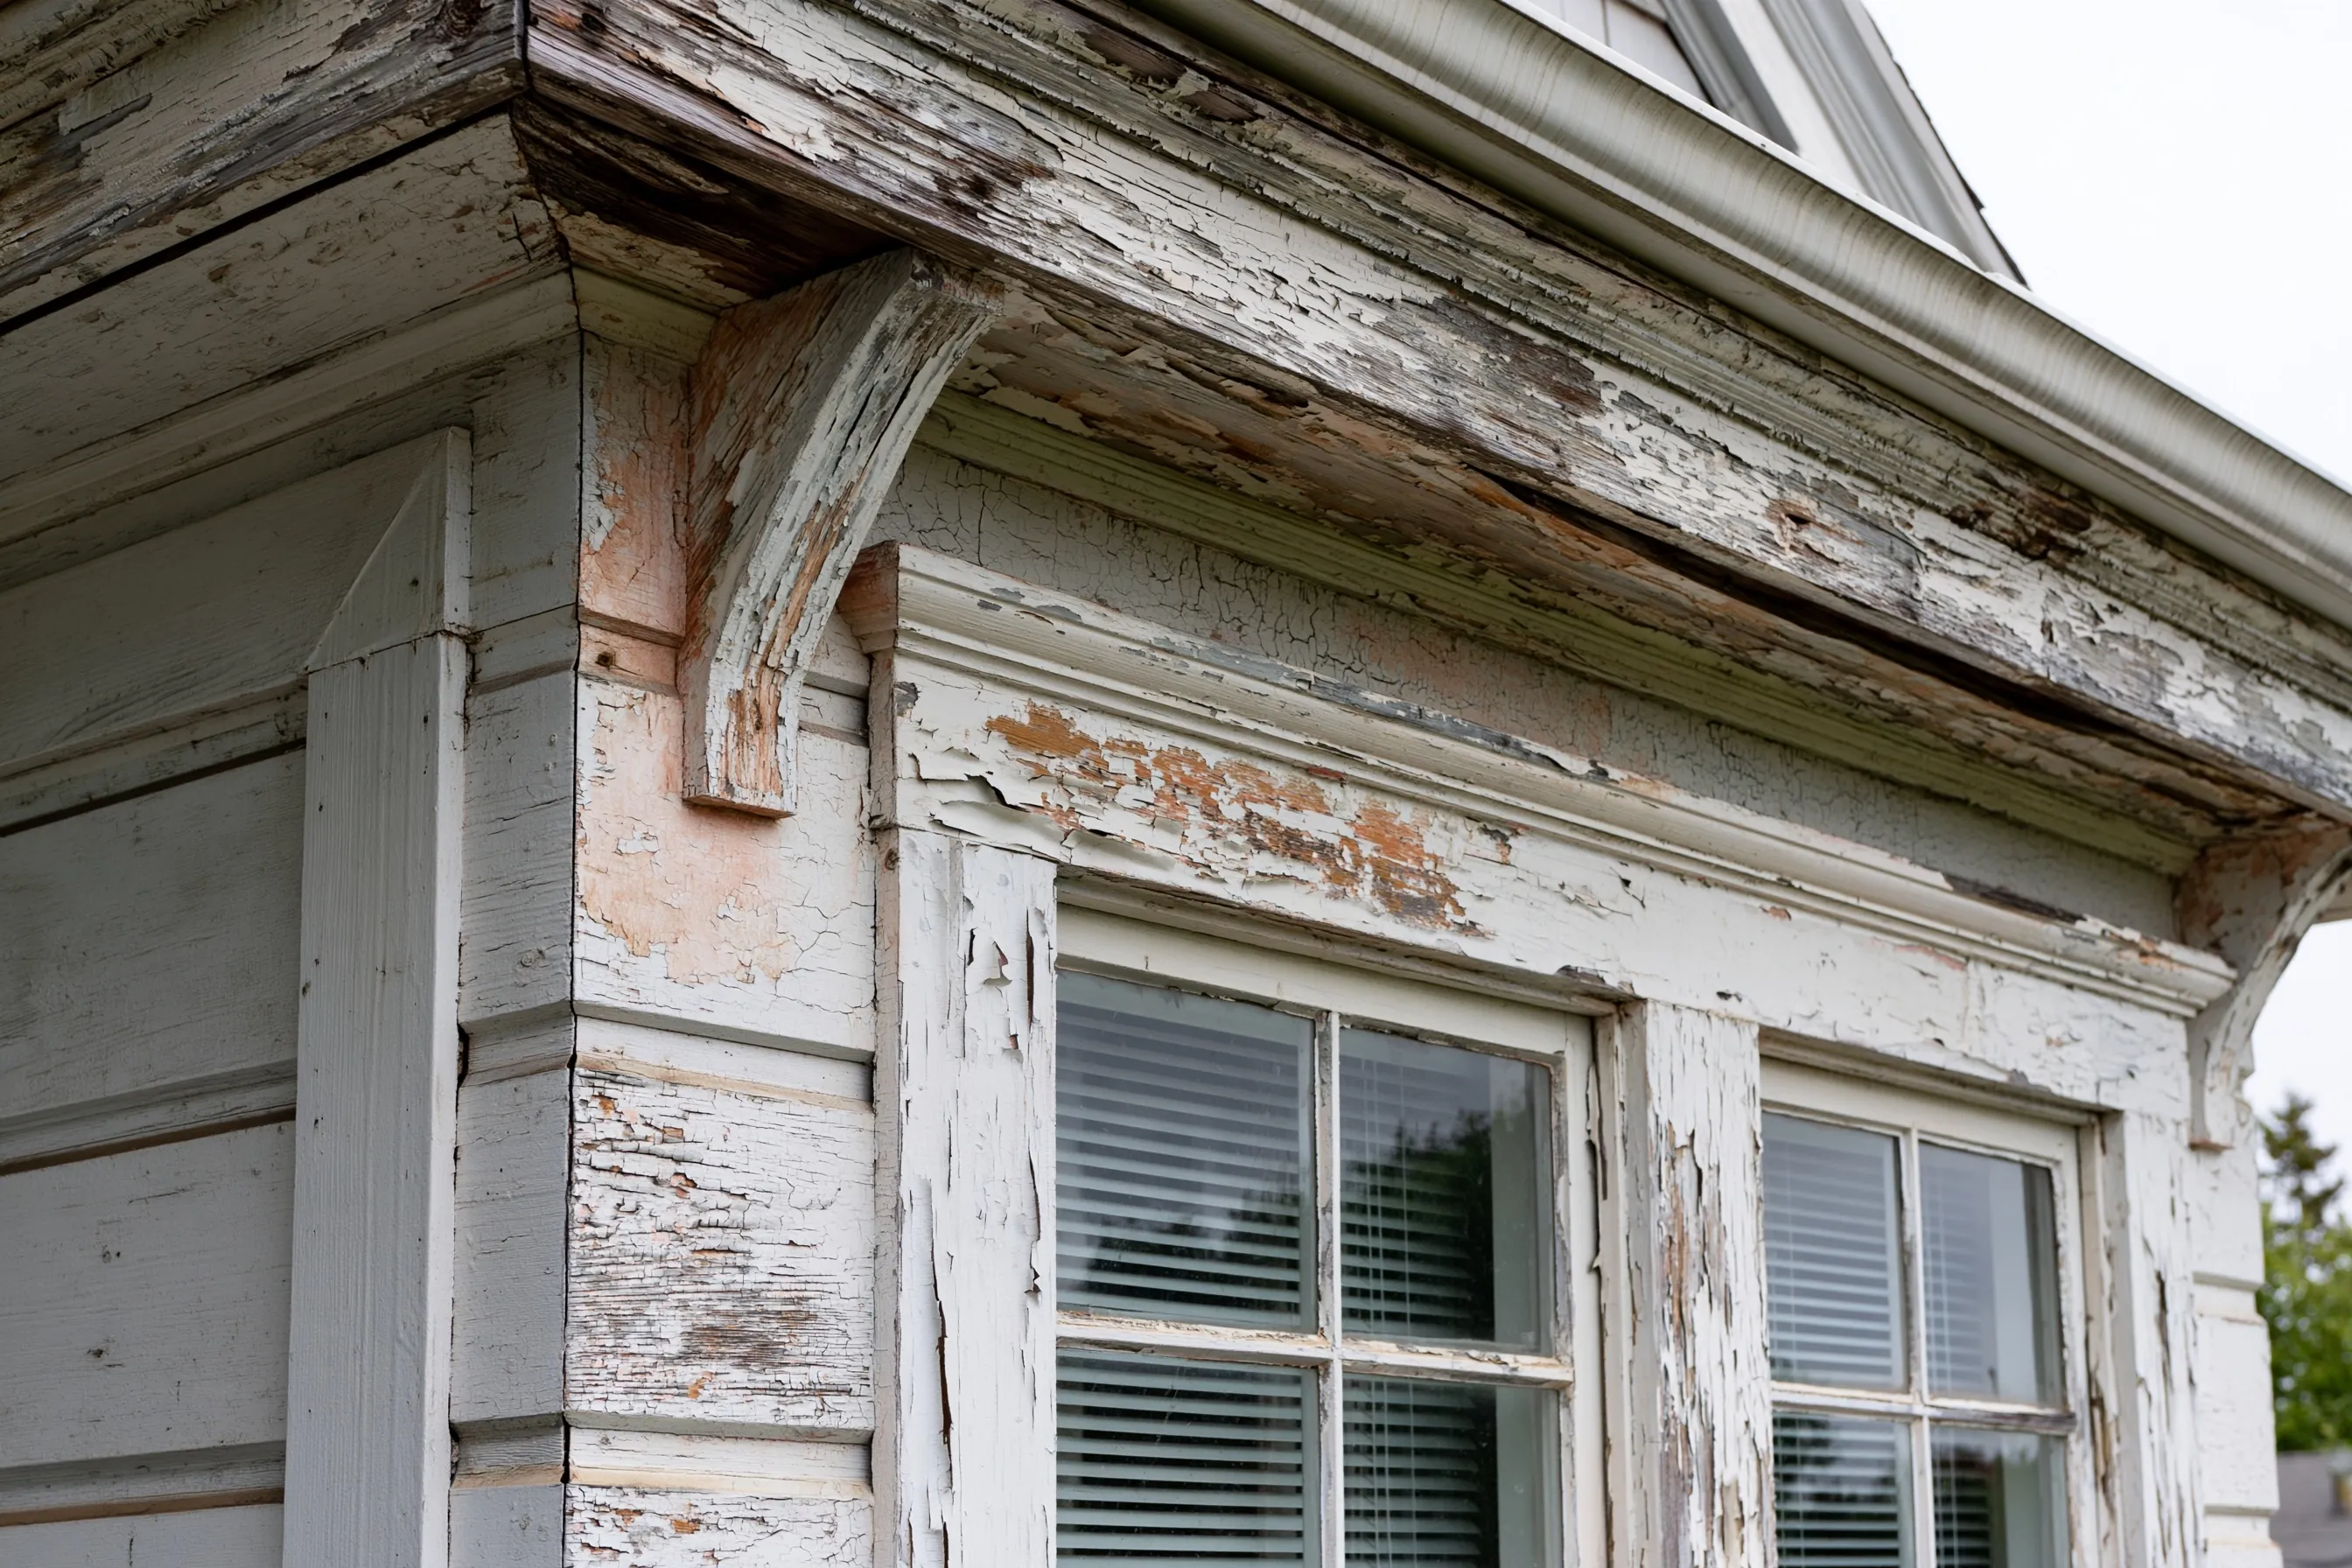
Close-up of an eave, fascia and window trim on an older wood-sided house with layers of white paint peeling and cracking
Home
1940s wood-sided house in Concord
Original request
Replace one of the two front windows, which no longer closes
Testing
Lead paint on the sash, the frame and the casing around the window
New window
One unit set in the existing opening, with a new casing
Left alone
The second window and the eave above, which get their own bids later
Estimated cost
$1,350

Scope of work

Plastic inside the room and on the ground below, the old sash, stops and casing misted and taken out whole, one new unit set in the existing opening, a new casing fitted, HEPA cleanup and a wet-cloth check of the sill and floor. Painting is not part of this price.

Project overview

In this example, the owners of a 1940s wood-sided house in Concord have a front window that no longer closes. The paint on its casing is cracking in layers, and a test shows lead paint on the sash, the frame and the casing.

Replacing a window in a house built before 1978 is always covered by the federal lead-safe rule, so the room is sealed and the ground below is covered while the old window and casing come out. The second front window and the eave above are left for a later job.

The goal

The goal is a window that closes, a new casing and no lead dust left in the room.

Process

  1. Testing Window, frame and casing tested and the opening measured.
  2. Setup Plastic laid inside and below the window, the room closed off.
  3. Window Old sash and casing out whole, new unit set, new casing fitted.
  4. Check HEPA cleanup and a wet-cloth check of the sill and floor.

Planning right

  • A window that no longer closes is often a sign the frame has moved or rotted. Soft wood is replaced at extra cost.
  • The old casing leaves the house wrapped, not scraped off on the lawn.
  • The window next to it carries the same old paint. Test it before it is touched.
  • A new casing is painted after the check, not before.

Get a free quoteMore about lead paint window and door removal

Lead test of a large two-story house before three generations move in

Example project

Home
1960s two-story house in Concord, about 3,100 sq ft
Original request
Know every painted part before the grandparents, parents and children share the house
Testing
Readings on window frames, the stair railing, door casings, kitchen cabinets, the garage door and exterior trim, with chips sent to the lab
Found
Lead paint on the stair railing, the upstairs window frames, the garage door and the kitchen cabinets; the rest tests clear
Report
A written report from a certified inspector with each part listed
Estimated cost
$1,000

Scope of work

A visit to the whole house and the outside, readings on each type of painted part, paint chips to the lab where a reading is unclear, and a written report that lists each part as positive or negative.

Project overview

In this example, a family is buying a 1960s two-story house in Concord of about 3,100 square feet, where grandparents, parents and young children will live together. They want to know every painted part that carries lead before the move.

The test shows lead paint on the stair railing, the upstairs window frames, the garage door and the kitchen cabinets, and the rest of the house tests clear. The family can plan repairs part by part, starting with the stair railing that small hands hold every day.

The goal

The goal is a family that moves in knowing which parts carry lead paint and what to fix first.

Process

  1. Booking Build year and the family’s plans shared with the inspector.
  2. Testing Readings on every type of painted part, with chips sent where a reading is unclear.
  3. Report Positive and negative parts listed, with a note on what to fix first.

Planning right

  • Surfaces that children touch or chew come first: railings, window sills and cabinet edges.
  • Parts that test clear need no special setup when they are repaired.
  • Paid repairs to the positive parts fall under the federal lead-safe rules.
  • Keep the report with the house papers.

Get a free quoteMore about lead paint inspection and testing

Painted cabinets, trim and walls sealed in a 1950s kitchen

Example project

Home
1950s single-story house in Concord with a painted wood kitchen
Original request
Keep the original kitchen cabinets and trim and seal the old paint for good
Testing
Lead paint on the cabinet faces, the window trim and the walls; the paint is sound
Surfaces
About 300 sq ft of cabinet faces, trim and walls
Method
Coating made to last 20 years or more, with a written plan and clearance
Estimated cost
$3,300

Scope of work

Plastic over the floor and the counters, the cabinets emptied and their doors taken off, all surfaces washed, loose spots misted and scraped, a bonding patch tested, two coats of a coating made to last 20 years or more, doors rehung, HEPA cleanup and a clearance test.

Project overview

In this example, the owners of a 1950s house in Concord like their painted wood kitchen and want to keep it. A test shows lead paint on the cabinet faces, the window trim and the walls, and all of it is still firmly attached.

Sealing the surfaces keeps the cabinets and costs far less than new ones. The coating is made to last 20 years or more, which makes the job abatement. It is done by certified workers under a written plan, with the notice posted and sent at least five days ahead and a clearance test at the end.

The goal

The goal is the original kitchen kept in place, with its lead paint sealed behind a coating made to last.

Process

  1. Plan Written plan prepared, Form 8551 posted and sent.
  2. Kitchen cleared Kitchen emptied, doors off, surfaces washed and loose spots scraped wet.
  3. Bond test One cabinet door coated to see whether the coating bonds to the old paint.
  4. Coating Two coats on everything, doors rehung, then HEPA cleanup and the clearance test.

Planning right

  • Cabinet doors and drawer edges rub, so they are checked first each year.
  • A test patch on the back of one cabinet door shows whether the coating bonds before the rest is done.
  • A new window or counter later disturbs the paint again. Plan it lead-safe.
  • File the written plan and the clearance result with the kitchen papers.

Get a free quoteMore about lead paint encapsulation

Request a free lead paint removal quote

Send the address and the year the building went up, and tell us which surfaces or rooms you have in mind and who lives there. We'll get back to you soon with an estimate or any questions we have. Estimates are free and there's no obligation.

Call (925) 445-2575

Call (925) 445-2575